source: https://medium.com/aimonks/agentic-rag-with-llama-index-router-query-engine-01-381e83a418af
Notes
Origin
Tired of the good old RAG (Retrieval Augmented Generation) systems we have extensively covered in my blog posts? Well, I am tired of them. Let’s do something fun to take things to the next level. Let’s go over building your own Agentic RAG systems, introducing the idea of agents into a well defined RAG system workflow.
厌倦了我们在博文中广泛介绍的老式 RAG(检索增强一代)系统吗?我已经厌倦了。让我们来做点有趣的事,让一切更上一层楼。让我们来构建自己的代理 RAG 系统,将代理的理念引入定义明确的 RAG 系统工作流程。

Image By Code With Prince
图片来源:王子的代码
Last year the buzz word was all about RAG systems, this year things have taken a turn, it’s all about agents now. If you miss the RAG buss word era, well it’s fine because we can introduce agents into RAG systems as well. Good thing is it’s even better.
去年的热门话题都是关于 RAG 系统,而今年事情有了转机,现在都是关于代理的了。如果你怀念 RAG 总线时代,没关系,因为我们也可以将代理引入 RAG 系统。好消息是,这样会更好。
In this article, we’ll go over how to implement a basic Agentic RAG application using Llama-index. This is the first article in a series of articles I’ll be posting in the upcoming weeks on Agentic RAG architectures.
在本文中,我们将介绍如何使用 Llama-index 实现基本的代理 RAG 应用程序。这是我将在未来几周内发布的一系列关于 Agentic RAG 架构的文章中的第一篇。
Basic Retrieval Augemented Generation (RAG) Pipeline
基本检索增强生成(RAG)管道
Before we move on, I just want to give a quick refresher on what a traditional RAG architecture looks like and works. This knowledge will be useful later on and also to beginners who don’t know how a basic RAG pipeline works.
在继续阅读之前,我想先简单介绍一下传统 RAG 架构的外观和工作原理。这些知识对以后的学习和不了解基本 RAG 管道工作原理的初学者都很有用。
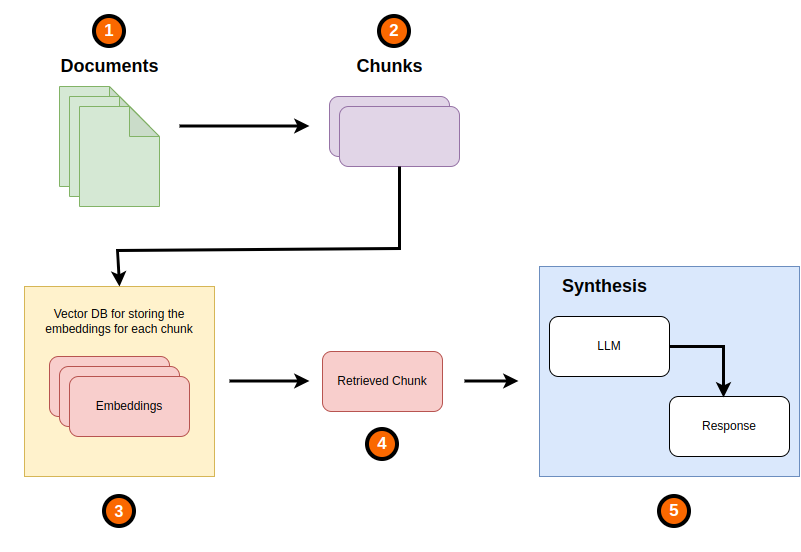
Image By Code With Prince
图片来源:Prince 代码
**From the above image of a simple RAG system, we simply have the following that we work with:
从上图的简单 RAG 系统中,我们只需使用以下内容:**
-
Documents: This is the context that you want to augment your LLM with external information that it feeds into an LLM. This could be a PDF or any other text document or even images for a multimodal LLM.
文件:这是您希望用外部信息来增强 LLM 的上下文,并将其输入 LLM 中。这可以是 PDF 或任何其他文本文档,甚至是多模态 LLM 的图像。
-
Chunks: The larger Document is broken down into smaller sizes that are typically called chunks sometimes also called nodes.
分块:较大的文档被分解成较小的尺寸,这些尺寸通常称为块,有时也称为节点。
-
Embeddings: Once we have the smaller sized chunks, we create vector embeddings for them. Once a user query is received, a similarity search is performed and the most similar document(s) are retrieved, the retrieval part of RAG. These retrieved chunks of document are sent alongside the user query to the LLM as, with the retrieved document(s) acting as the context. From this, a response is generated by the LLM.
嵌入:有了较小的块后,我们就可以为它们创建向量嵌入。一旦收到用户查询,就会执行相似性搜索,并检索出最相似的文档,这就是 RAG 的检索部分。这些检索到的文档块将与用户查询一起发送到 LLM ,并以检索到的文档作为上下文。LLM 据此生成响应。
The above explanation is how a typical traditional RAG system works.
上述解释就是典型的传统 RAG 系统的工作原理。
Why Agentic RAG 为什么选择代理 RAG
We have seen the implementation of a simple RAG from above, this approach is suitable for simple QA tasks over one or few documents. Not suitable for complex QA tasks and summarization over larger sets of documents.
我们已经从上文看到了简单 RAG 的实现,这种方法适用于对一个或几个文档进行简单的质量检查任务。但并不适合复杂的质量保证任务和较大文档集的汇总。
This is where agents can come into play, to help take the simple RAG implementation to a whole other new level. With agentic RAG systems, more complex tasks such as document summarization, complex QA and a host of other tasks can be carried much more easily. Agentic RAG also gives you the ability to incorporate tool calling into your RAG system and these tools can be custom functions that you define yourself.
这时,代理就能发挥作用,帮助将简单的 RAG 实现提升到另一个全新的水平。有了代理 RAG 系统,就能更轻松地执行更复杂的任务,如文档汇总、复杂的质量保证和其他大量任务。Agentic RAG 还能将工具调用纳入 RAG 系统,这些工具可以是您自己定义的自定义功能。
In this series of articles, we’ll go over the following:
在本系列文章中,我们将介绍以下内容:
-
Router Query Engines: This is the simplest form a an agentic RAG. This gives use the ability to add logic statements that can help LLM decide on which route to route a specific task depending on the task(s) that need to be carried out and the set of tools we made available to the LLM.
路由器查询引擎:这是最简单的代理 RAG 形式。它提供了添加逻辑语句的能力,可以帮助 LLM 根据需要执行的任务和我们提供给 LLM 的工具集来决定特定任务的路由。
-
Tool Calling: Here we’ll go over how to add our own custom tools to the agentic RAG architecture. Here we implement interfaces for agents to select one tool from a host of tools we’ll provide to them and then let the LLM provide the arguments needed to be passed to call these tools as these tools are simply Python functions, at least the ones you have defined yourself.
工具调用:在这里,我们将介绍如何在代理 RAG 架构中添加我们自己的自定义工具。在这里,我们为代理实现了接口,让他们从我们提供的大量工具中选择一种工具,然后让 LLM 提供调用这些工具所需的参数,因为这些工具只是 Python 函数,至少是你自己定义的函数。
-
**Agentic RAG With Multi-step Reasoning Capabilities:
具有多步推理能力的 Agentic RAG:**
-
**Agentic RAG With Multi-step Reasoning Capabilities With Multiple Documents
具有多文档多步骤推理能力的代理 RAG**
Router Query Engine 路由器查询引擎
This is the most simplest form of agentic RAG in Llama-index at least. In this approach we simply have a router engine that, with the help of an LLM, determines what tool or query engine to use to address a given user query.
至少在 Llama-index 中,这是最简单的代理 RAG 形式。在这种方法中,我们只需要一个路由器引擎,在 LLM 的帮助下,确定使用什么工具或查询引擎来处理给定的用户查询。
This is the basic implementation of how a router query engine works.
这就是路由器查询引擎的基本工作原理。
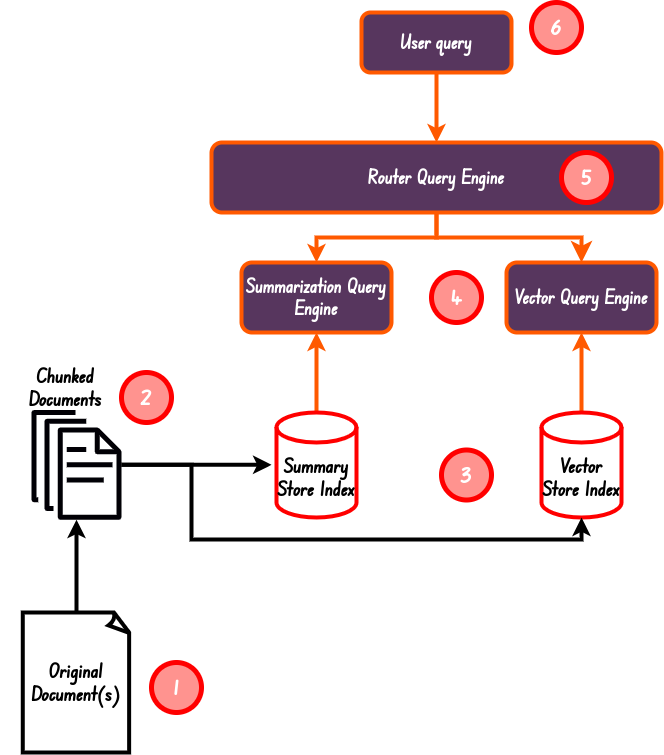
Image By Code With Prince
图片来源:Prince 代码
Project Environment Setup
项目环境设置
To setup your development environment, create a folder called agentic_rag , inside of this folder, create another folder called basics . Once done, navigate into the basics folder and initialize a Python Poetry project
要设置开发环境,请创建一个名为 agentic_rag 的文件夹,并在该文件夹内创建另一个名为 basics 的文件夹。完成后,进入 basics 文件夹并初始化 Python Poetry 项目。
$ poetry init
To get started, make sure you have your OpenAI API key ready, you can get your key from here if you don’t already have it. Once you have your api key ready, add it to your .env file:
要开始工作,请确保已准备好 OpenAI API 密钥,如果还没有,可以从这里获取密钥。准备好 API 密钥后,将其添加到 .env 文件中:
OPENAI_API_KEY=sk-xxxxxxxxxxxxxxxxxxxxxxxxxxxxxxxxxxxxxxxxx
So where is this .env file? Well I created an development env setup as follows:
那么这个 .env 文件在哪里呢?我创建了一个开发环境,设置如下:

Image By Code With Prince
图片来源:Code With Prince
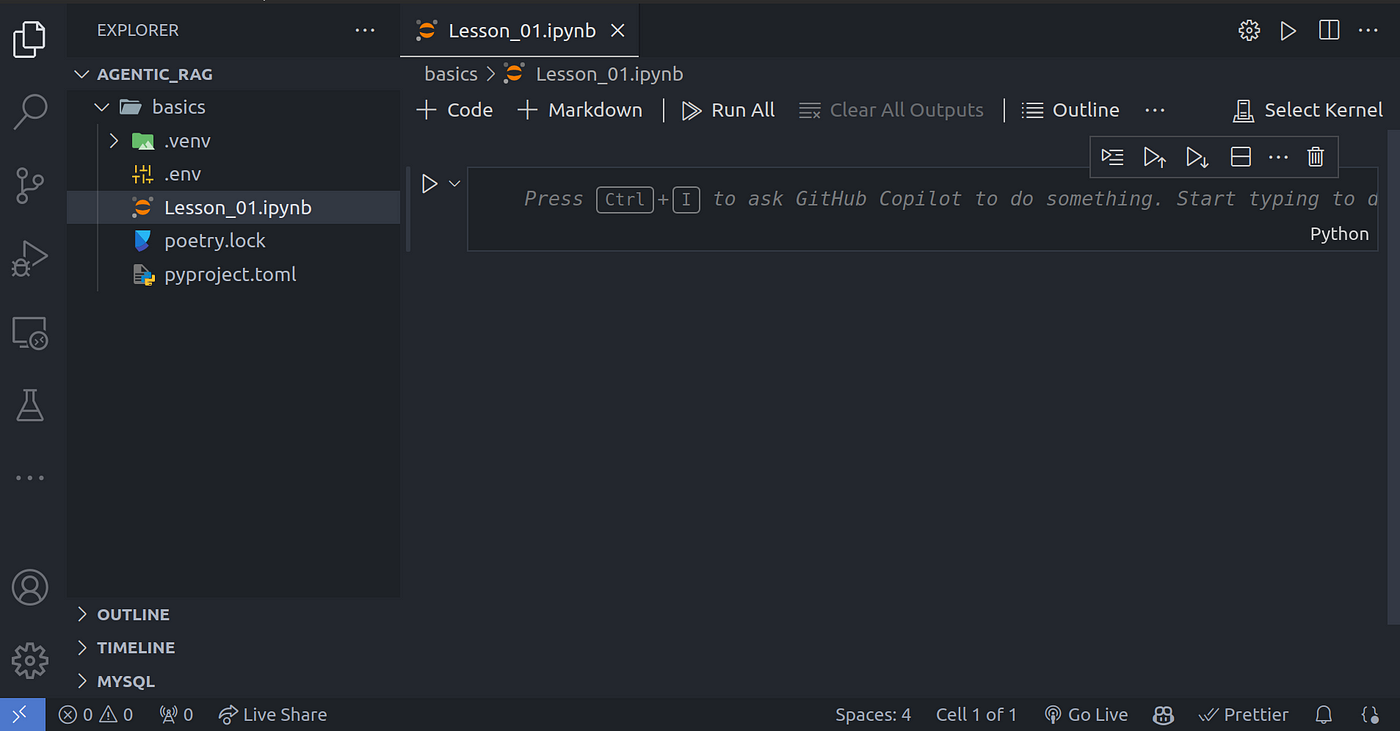
Image By Code With Prince
通过王子代码生成图像
Follow this directory structure and add in your files as shown in the images above.
按照此目录结构,如上图所示添加文件。
Installing Packages 安装软件包
We’ll use Llama-index for this. Let’s install it along with some other libraries we’ll make use of:
为此,我们将使用 Llama-index。让我们安装它和其他一些我们要用到的库:
$ poetry add python-dotenv ipykernel llama-index nest_asyncio
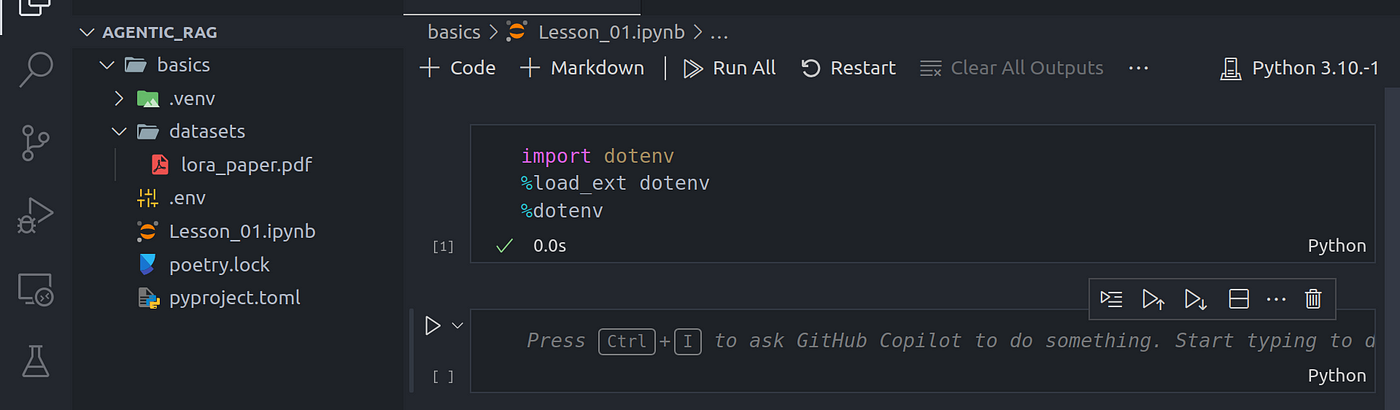
Downloading Dataset 下载数据集
We’ll need a PDF file to experiment with. You can download this PDF from here. Again, feel free to use any PDF file of your liking.
我们需要一个 PDF 文件来进行实验。你可以从这里下载 PDF 文件。同样,你也可以使用任何你喜欢的 PDF 文件。
Load And Spitting Document Into Nodes
将文档加载到节点并吐出
Now we are ready to get started, let’s first load in our environment variables using the python-dotenv library we just installed:
现在我们可以开始了,首先使用刚刚安装的 python-dotenv 库加载环境变量:
import dotenv%load_ext dotenv%dotenv
We’ll also use the nest-asyncio library since Llama-index uses a lot of asyncio functionality in the background:
我们还将使用 nest-asyncio 库,因为 Llama-index 在后台使用了大量 asyncio 功能:
import nest_asyncionest_asyncio.apply()
Now, let’s load in our data:
现在,让我们加载数据:
from llama_index.core import SimpleDirectoryReader

# load lora_paper.pdf documents
documents = SimpleDirectoryReader(input_files=["./datasets/lora_paper.pdf"]).load_data()
Creating Document Chunks 创建文档块
Once we have the data loaded successfully, let’s move ahead to break the largest document down into chunks of 1024 chunk sizes:
数据加载成功后,我们继续将最大的文档分解成 1024 块大小的分块:
from llama_index.core.node_parser import SentenceSplitter

# chunk_size of 1024 is a good default value
splitter = SentenceSplitter(chunk_size=1024)
# Create nodes from documents
nodes = splitter.get_nodes_from_documents(documents)
We can get more info about each of these nodes using:
我们可以通过以下方法获取每个节点的更多信息:
node_metadata = nodes[1].get_content(metadata_mode=True)
print(node_metadata)

Image By Code With Prince
使用 Prince 按代码生成图像
Creating LLM And Embedding Models
创建 LLM 并嵌入模型
We’ll use the OpenAI gpt-3.5-turbo model as the LLM and the text-embedding-ada-002 embedding model to create the embeddings.
我们将使用 OpenAI 的 gpt-3.5-turbo 模型作为 LLM 和 text-embedding-ada-002 嵌入模型来创建嵌入。
from llama_index.core import Settings
from llama_index.llms.openai import OpenAI
from llama_index.embeddings.openai import OpenAIEmbedding

# LLM model
Settings.llm = OpenAI(model="gpt-3.5-turbo")
# embedding model
Settings.embed_model = OpenAIEmbedding(model="text-embedding-ada-002")
Creating indexes 创建索引
As shown in the images earlier on, we’ll have two main indexes that we’ll use:
如前面的图片所示,我们将使用两个主要索引:
-
Summary Index: I got this explanation from the official Llamaindex docs:
摘要索引:我是从 Llamaindex 官方文档中得到的解释:
The summary index is a simple data structure where nodes are stored in a sequence. During index construction, the document texts are chunked up, converted to nodes, and stored in a list.
摘要索引是一种简单的数据结构,节点按顺序存储。在索引构建过程中,文档文本被分块、转换为节点并存储在列表中。
During query time, the summary index iterates through the nodes with some optional filter parameters, and synthesizes an answer from all the nodes.
在查询时,摘要索引会使用一些可选的过滤参数遍历节点,并从所有节点中合成一个答案。
- Vector Index: This is just a regular index store created from word embeddings from which we can perform similarity searches to get the
nmost similar index.
2.向量索引:这只是一个由单词嵌入创建的普通索引存储,我们可以从中进行相似性搜索,以获得 n 最相似的索引。
We can use the code below to create these two indexes:
我们可以使用下面的代码来创建这两种索引:
from llama_index.core import SummaryIndex, VectorStoreIndex

# summary index
summary_index = SummaryIndex(nodes)
# vector store index
vector_index = VectorStoreIndex(nodes)
Turning Vector Indexes To Query Engines
将向量索引转化为查询引擎
Once that we now have the vector indexes created and stored, we’ll now need to move ahead to creating the query engines that we’ll convert to tools aka query tools that our agents can use later on.
创建并存储好向量索引后,我们就需要创建查询引擎,并将其转换为工具,也就是我们的代理稍后可以使用的查询工具。
# summary query engine
summary_query_engine = summary_index.as_query_engine(
    response_mode="tree_summarize",
    use_async=True,
)

# vector query engine
vector_query_engine = vector_index.as_query_engine()
In the case above, we have two different query engines. Each of these query engines we’ll place under a router query engine that will then decide what query engine to route to depending on the user query.
在上面的案例中,我们有两个不同的查询引擎。每个查询引擎都将置于路由器查询引擎之下,路由器查询引擎将根据用户查询决定路由到哪个查询引擎。
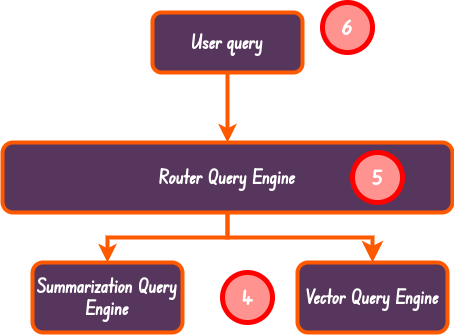
Image By Code With Prince
图片来源:Code With Prince
In the above code, we are specifying the use_async parameter for faster querying, this is one of the reasons we also had to use the next_asyncio library.
在上述代码中,我们指定 use_async 参数是为了加快查询速度,这也是我们必须使用 next_asyncio 库的原因之一。
Query Tools 查询工具
A query tool is simply a query engine with metadata, specifically a description of what the query tool can be used for or is for. This helps the router query engine to then be able to decide what query engine tool to route to depending on the query it receives.
查询工具就是一个带有元数据的查询引擎,具体来说就是对查询工具用途的描述。这有助于路由器查询引擎根据收到的查询决定路由到哪个查询引擎工具。
from llama_index.core.tools import QueryEngineTool


summary_tool = QueryEngineTool.from_defaults(
    query_engine=summary_query_engine,
    description=(
        "Useful for summarization questions related to the Lora paper."
    ),
)

vector_tool = QueryEngineTool.from_defaults(
    query_engine=vector_query_engine,
    description=(
        "Useful for retrieving specific context from the the Lora paper."
    ),
)
Router Query Engine 路由器查询引擎
Finally, we can go on ahead to creating the router query engine tool. This will enable us to use all the query tools we created from the query engines we defined above, specifically the summary_tool and the vector_tool .
最后,我们可以继续创建路由器查询引擎工具。这将使我们能够使用从上面定义的查询引擎中创建的所有查询工具,特别是 summary_tool 和 vector_tool 。
Image By Code With Prince
使用 Prince 代码创建图片
from llama_index.core.query_engine.router_query_engine import RouterQueryEngine
from llama_index.core.selectors import LLMSingleSelector


query_engine = RouterQueryEngine(
    selector=LLMSingleSelector.from_defaults(),
    query_engine_tools=[
        summary_tool,
        vector_tool,
    ],
    verbose=True
)
LLMSingleSelector: This is a selector that uses the LLM to select a single choice from a list of choices. You can read more about it from here.
LLMSingleSelector:这是一个选择器,使用 LLM 从选择列表中选择一个选项。你可以从这里阅读更多关于它的信息。
Testing Out The Router Query Engine
测试路由器查询引擎
Let’s go ahead and use the following piece of code to test out the router query engine:
让我们使用下面的代码来测试路由器查询引擎:
response = query_engine.query("What is the summary of the document?")
print(str(response))
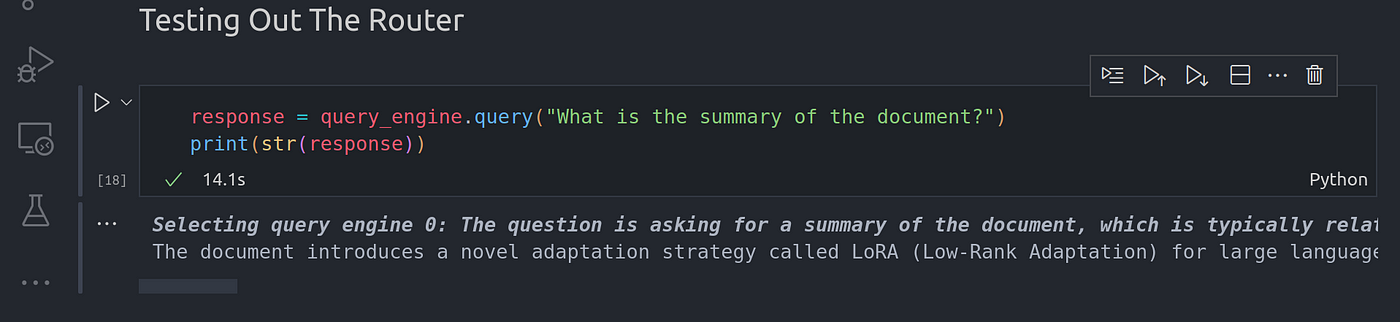
Image By Code With Prince
图像代码与王子
Above is the summary of the paper that is summarized over all the context in the given Lora-paper we passed on to the summarization query engine
以上是我们传递给摘要查询引擎的给定 Lora 论文中所有上下文的摘要。
Since we are using the summary index that stores all nodes in a sequential list, all nodes are visited and a general summary is generated from all the nodes to get the final summary.
由于我们使用的摘要索引将所有节点存储在一个顺序列表中,因此所有节点都会被访问,并从所有节点中生成一个总摘要,从而得到最终摘要。
You can confirm this by checking the length of the response, the source_nodes attribute returns to us the sources used to generate the summary.
您可以通过检查响应的长度来确认这一点, source_nodes 属性会向我们返回用于生成摘要的来源。
print(len(response.source_nodes))

Image By Code With Prince
图片来源:Prince 代码
You can notice the number 38 is the same as the number of the nodes we got after performing document chunking. This means all the chunked nodes have been used to generate the summary.
你可以注意到数字 38 与我们执行文档分块后得到的节点数相同。这意味着所有的分块节点都已用于生成摘要。
Let’s ask another question that does not involve the use of the summary tool.
让我们再问一个不涉及使用摘要工具的问题。
response = query_engine.query("What is the long from of Lora?")
print(str(response))

Image By Code With Prince
使用 Prince 代码生成图像
This uses the vector index tool, the response is not so accurate nevertheless.
这使用的是矢量索引工具,不过响应并不是很准确。
Putting It All Together 将其组合在一起
Now that we have understood this basic pipeline, let’s move ahead into converting this into a pipeline function that we call utilize later.
既然我们已经了解了这个基本流水线,那么接下来就把它转换成一个流水线函数,我们稍后再调用它。
async def create_router_query_engine(
    document_fp: str,
    verbose: bool = True,
) -> RouterQueryEngine:
    # load lora_paper.pdf documents
    documents = SimpleDirectoryReader(input_files=[document_fp]).load_data()

    # chunk_size of 1024 is a good default value
    splitter = SentenceSplitter(chunk_size=1024)
    # Create nodes from documents
    nodes = splitter.get_nodes_from_documents(documents)

    # LLM model
    Settings.llm = OpenAI(model="gpt-3.5-turbo")
    # embedding model
    Settings.embed_model = OpenAIEmbedding(model="text-embedding-ada-002")

    # summary index
    summary_index = SummaryIndex(nodes)
    # vector store index
    vector_index = VectorStoreIndex(nodes)

    # summary query engine
    summary_query_engine = summary_index.as_query_engine(
        response_mode="tree_summarize",
        use_async=True,
    )

    # vector query engine
    vector_query_engine = vector_index.as_query_engine()

    summary_tool = QueryEngineTool.from_defaults(
        query_engine=summary_query_engine,
        description=(
            "Useful for summarization questions related to the Lora paper."
        ),
    )

    vector_tool = QueryEngineTool.from_defaults(
        query_engine=vector_query_engine,
        description=(
            "Useful for retrieving specific context from the the Lora paper."
        ),
    )


    query_engine = RouterQueryEngine(
        selector=LLMSingleSelector.from_defaults(),
        query_engine_tools=[
            summary_tool,
            vector_tool,
        ],
        verbose=verbose
    )


    return query_engine
We can then call this function as so:
我们可以这样调用这个函数
query_engine = await create_router_query_engine("./datasets/lora_paper.pdf")
response = query_engine.query("What is the summary of the document?")
print(str(response))

Image By Code With Prince
图片来源:Prince 代码
Let’s move on ahead and create a utils.py file and have the following inside of it:
让我们继续前进,创建一个 utils.py 文件,并在其中包含以下内容:
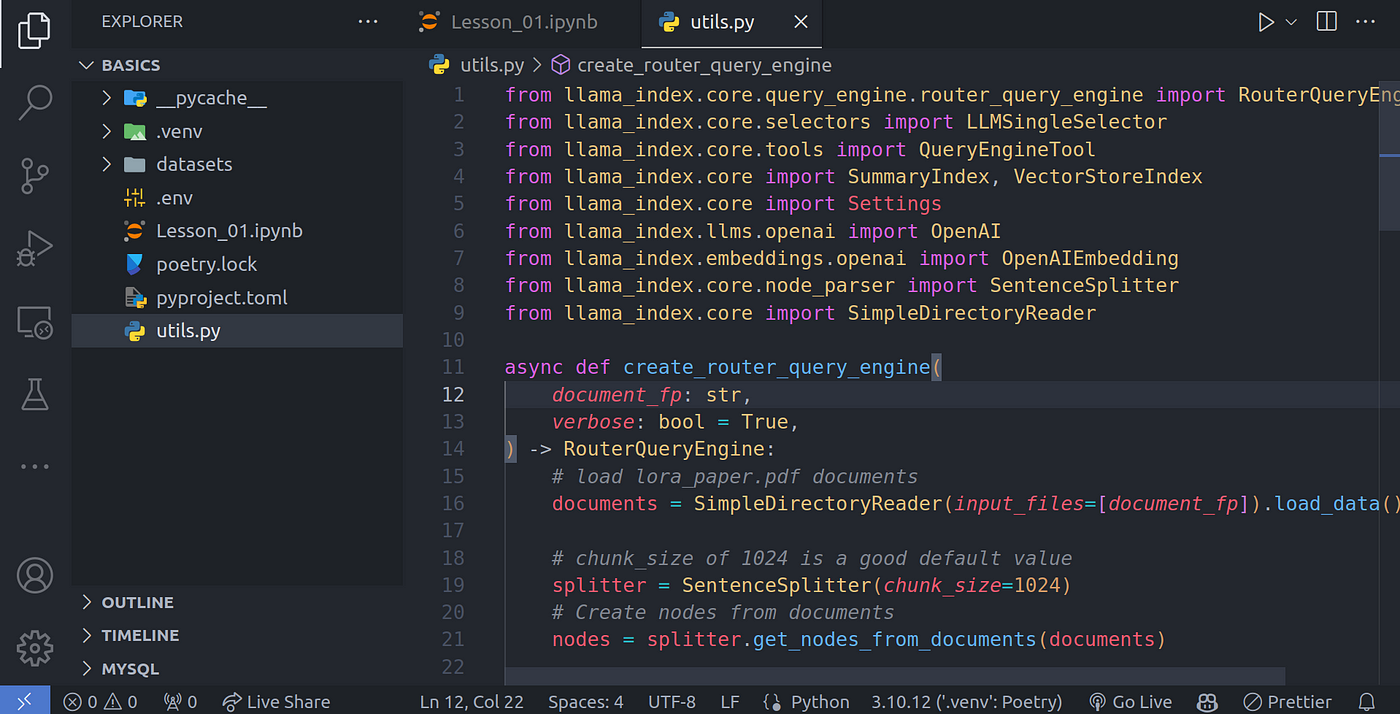
Image By Code With Prince
图片由王子的代码提供
from llama_index.core.query_engine.router_query_engine import RouterQueryEngine
from llama_index.core.selectors import LLMSingleSelector
from llama_index.core.tools import QueryEngineTool
from llama_index.core import SummaryIndex, VectorStoreIndex
from llama_index.core import Settings
from llama_index.llms.openai import OpenAI
from llama_index.embeddings.openai import OpenAIEmbedding
from llama_index.core.node_parser import SentenceSplitter
from llama_index.core import SimpleDirectoryReader

async def create_router_query_engine(
    document_fp: str,
    verbose: bool = True,
) -> RouterQueryEngine:
    # load lora_paper.pdf documents
    documents = SimpleDirectoryReader(input_files=[document_fp]).load_data()

    # chunk_size of 1024 is a good default value
    splitter = SentenceSplitter(chunk_size=1024)
    # Create nodes from documents
    nodes = splitter.get_nodes_from_documents(documents)

    # LLM model
    Settings.llm = OpenAI(model="gpt-3.5-turbo")
    # embedding model
    Settings.embed_model = OpenAIEmbedding(model="text-embedding-ada-002")

    # summary index
    summary_index = SummaryIndex(nodes)
    # vector store index
    vector_index = VectorStoreIndex(nodes)

    # summary query engine
    summary_query_engine = summary_index.as_query_engine(
        response_mode="tree_summarize",
        use_async=True,
    )

    # vector query engine
    vector_query_engine = vector_index.as_query_engine()

    summary_tool = QueryEngineTool.from_defaults(
        query_engine=summary_query_engine,
        description=(
            "Useful for summarization questions related to the Lora paper."
        ),
    )

    vector_tool = QueryEngineTool.from_defaults(
        query_engine=vector_query_engine,
        description=(
            "Useful for retrieving specific context from the the Lora paper."
        ),
    )


    query_engine = RouterQueryEngine(
        selector=LLMSingleSelector.from_defaults(),
        query_engine_tools=[
            summary_tool,
            vector_tool,
        ],
        verbose=verbose
    )


    return query_engine
We can then utilize this function call from this file later on:
之后,我们就可以利用这个文件中的函数调用:
from utils import create_router_query_engine

query_engine = await create_router_query_engine("./datasets/lora_paper.pdf")
response = query_engine.query("What is the summary of the document?")
print(str(response))
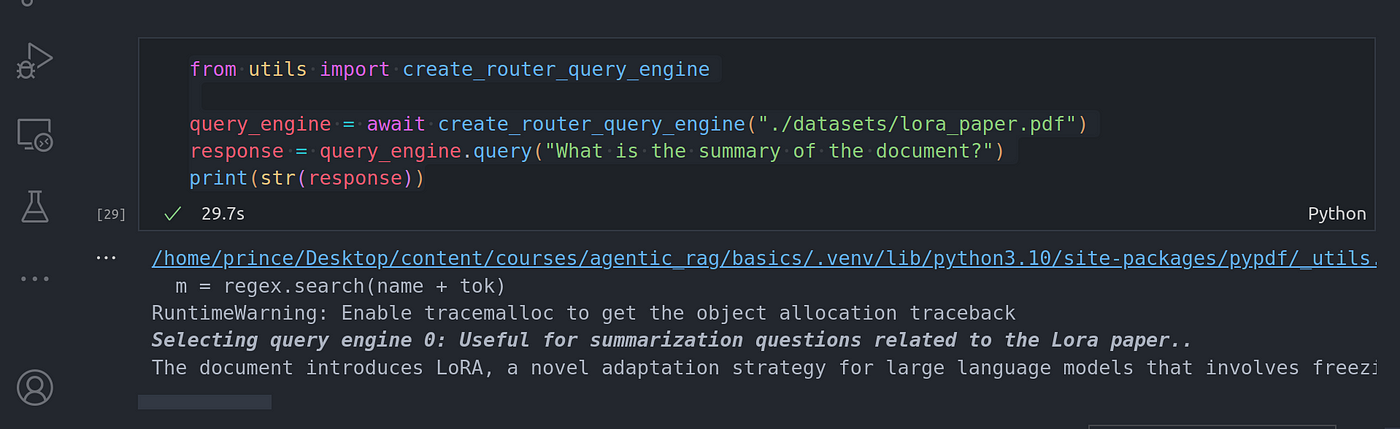
Image By Code With Prince
用 Prince 代码制作图片
Conclusion 结论
Congratulations for making it this far. That’s all we’ll cover in this article, in the next article, we’ll go over how to use a Tool Calling aka Function Calling.
恭喜你走到了这一步。本文就介绍到这里,在下一篇文章中,我们将介绍如何使用工具调用(Tool Calling)又称函数调用(Function Calling)。
**Other platforms where you can reach out to me:
其他可以联系我的平台:**
**Happy coding! And see you next time, the world keeps spinning. **
编码快乐!下次再见,世界在继续转动。